 EN

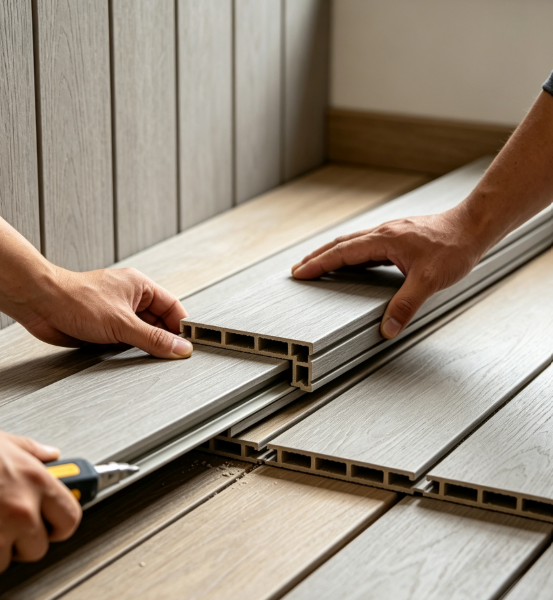
Substrate Preparation for Optimal WPC Wall Cladding Adhesion and Longevity
Before panels are fixed, substrate quality determines how well WPC wall cladding performs over time. The right preparation prevents peeling, warping, and moisture damage—and speeds up installation. Evaluate the existing wall type first, then correct surface defects.
Evaluating Common Substrates: Drywall, Concrete, and Wood Framing Compatibility
Each substrate behaves differently under load, moisture, and temperature. Drywall offers a smooth finish but limited holding strength; lightweight WPC panels can be adhered directly, but larger profiles must be fixed to studs or vertical furring channels. Concrete provides strong support but often carries residual moisture or alkalinity—check for efflorescence and test surface pH, as values above 10 may weaken adhesives over time. Wood framing is the most common substrate, but it must be dry, straight, and free of rot before cladding. Studs should be spaced no more than 400 mm on center, and any bowed or twisted members must be straightened or replaced to avoid a wavy finished wall.
| Substrate | Typical compatibility | Key preparation requirement |
|---|---|---|
| Drywall | Good for lightweight panels | Locate studs or install furring strips |
| Concrete | Excellent if dry and sealed | Test moisture; apply alkali-resistant primer if needed |
| Wood framing | Good when dry and sound | Check moisture below 12%; treat for insects/fungi |
Critical Surface Conditions: Cleanliness, Flatness, Moisture Levels (<12% RH), and Priming Needs
Cleanliness is non-negotiable: dust, grease, or old paint reduce adhesive and fastener grip. Remove loose material and wipe down with a dry cloth. Flatness matters more than many realize—a deviation greater than 3 mm over a 2 m straightedge can cause visible lippage and stress on panel joints. Moisture is the most common failure point. Substrate moisture content must be below 12% RH (or equivalent wood moisture content below 12%) before installation; higher levels invite mold and dimensional movement. A simple moisture meter test across multiple wall zones identifies hidden dampness behind existing finishes. Concrete and masonry often require a moisture vapor barrier or alkali-resistant primer; wood framing may need a water-repellent primer, while drywall usually requires only cleaning and light sanding. Always allow primed or leveled areas to dry completely before proceeding.
Managing Thermal Expansion in WPC Wall Cladding Installations
Properly accounting for thermal movement is essential for the long-term appearance and structural stability of wood-plastic composite (WPC) wall cladding. WPC expands and contracts with temperature changes—but less than pure PVC resin. Published testing reports an average linear thermal expansion coefficient of 55.49 × 10⁻⁶/°C for PVC-based WPC, compared with 80 × 10⁻⁶/°C for PVC.
Expansion Gap Sizing Guidelines (Per ASTM D6341) and Regional Climate Adjustments
ASTM D6341 provides the testing framework for determining the coefficient of linear thermal expansion of plastic lumber and shapes. It does not prescribe a single gap size, but its measured value enables precise calculation of expected movement. For a 3,000 mm panel subjected to a 40°C temperature swing, the expected length change is about 6.7 mm. Adding a 2–3 mm safety margin means perimeter and butt joints should accommodate at least 9–10 mm in extreme conditions. In desert, high-altitude, or northern continental climates—with surface temperature swings of 50–60°C—increase this allowance by 25–40%. Dark-colored panels in full sun absorb more heat and require proportionally larger gaps. Mild coastal climates with small day-night differences can follow the standard calculation without extra allowance.
Consequences of Neglecting Thermal Movement: Warping, Gapping, and Fastener Failure
Failure to provide adequate movement allowance turns thermal expansion into concentrated stress. Long panels that cannot expand or contract push against each other, causing visible gapping at joints or edge crushing. In restrained installations, expansion can generate enough force to warp panel faces, bow spans between supports, or lift fasteners. Nails and screws near panel edges become overloaded, leading to premature pull-out or cracking around holes. Once fasteners loosen, repeated thermal cycles widen gaps, allow moisture behind the cladding, and accelerate deterioration. Warping also breaks the visual plane, making seams more visible after only one or two seasonal cycles. The result is not a material defect—but an installation failure: dimensionally stable WPC wall cladding still requires correct gap detailing to perform long term.
Acclimatization and Precision Alignment for Dimensional Stability of WPC Wall Cladding
The 48–72-Hour Acclimatization Protocol (ISO 22305 Compliance) and Its Impact on Panel Performance
Before fastening WPC wall cladding, let panels rest flat and unstrapped in the installation zone for 48–72 hours. This acclimatization protocol, aligned with ISO 22305 guidance, allows the composite material to equilibrate to ambient temperature and moisture. Stack panels on level bearers with airflow between layers. Keep them away from direct sunlight, wet floors, and HVAC discharge. Install only after the site has reached its normal occupied climate. Rushing this step often causes bowing, end-gap changes, or fastener stress after installation. A conditioned panel is more dimensionally stable, easier to align, and less likely to telegraph movement after fixing. For best results, record room temperature and relative humidity before opening packs. If conditions fall outside the manufacturer’s specified range, delay installation. The 48–72-hour window is a minimum—not a suggestion—when seasonal swings are large.
Avoiding Cumulative Tolerances: Layout, Leveling, and Joint Staggering Best Practices
After acclimatization, precision alignment controls cumulative tolerance. Start with a level horizontal baseline and a plumb vertical starter line—do not assume the floor or ceiling is true. Measure the wall in both directions and adjust the layout to avoid narrow slivers at edges. Use a laser level or chalk line at each row. Check running dimensions every third course to catch small errors before they stack. Stagger adjacent panel end joints by at least 300 mm—or follow the manufacturer’s minimum offset—to reduce visible repeating seams and distribute thermal movement. Keep panel-to-panel gaps uniform—typically 3–5 mm depending on climate and product. Re-check plumb and level after every few rows. Use spacer clips or setting blocks to hold gaps steady while fastening. Where corners meet, plan the sequence so both faces share the same reference line. Final adjustment should leave no row forced or sprung.
Fixing Methods and Supporting Accessories for Reliable WPC Wall Cladding Installation
The fixing method you choose for WPC wall cladding affects both long-term durability and visual finish. Installers generally use one of three approaches: adhesive bonding, mechanical screw fixing, or hidden clip systems. Each method requires compatible supporting accessories.
- Adhesive bonding: Use a high-strength hot-melt adhesive formulated specifically for WPC panels—not general construction adhesive. Apply it evenly to the back of each panel and press firmly until the initial bond sets. This works best on smooth, dust-free substrates and avoids visible fasteners.
- Screw fixing: For extra security, fasten panels at pre-drilled or slotted points with corrosion-resistant screws. This is especially useful for exterior walls or heavy panels because it reduces the risk of panels loosening under pressure or thermal movement.
- Clip or buckle systems: Attach mounting clips or brackets to the wall at even intervals, then slide each panel into place. Hidden clip systems allow slight expansion movement while maintaining a clean, fastener-free surface.
Supporting accessories such as edge trims, corner profiles, and joint fillers should match the panel profile and installation method. After fixing, inspect seam alignment and use a compatible filler or adhesive to correct minor gaps. Avoid abrasive cleaning tools during any post-installation touch-up to preserve the panel surface.
FAQ
What is the importance of preparing the substrate for WPC wall cladding?
Proper substrate preparation ensures long-term adhesion, prevents issues like peeling, warping, and moisture damage, and simplifies the installation process.
What are the key preparation requirements for different substrates?
For drywall, locate studs or install furring strips. For concrete, you need to test moisture levels and apply an alkali-resistant primer. For wood framing, ensure it is dry, straight, and free of rot.
Why is acclimatization necessary for WPC wall cladding?
Acclimatization allows WPC panels to equilibrate to the ambient temperature and moisture conditions, reducing the risk of bowing, end-gap changes, or fastener stress post-installation.
How much expansion gap should be left between WPC cladding panels?
An expansion gap of at least 9–10 mm for panels with a 40°C temperature swing is recommended. In extreme climates, this allowance should be increased by 25–40% based on specific conditions.
What are the common methods for fixing WPC wall cladding?
The common fixing methods include adhesive bonding, mechanical screw fixing, and hidden clip systems. The choice depends on the installation requirements and aesthetic preferences.
What are the consequences of ignoring thermal movement allowances?
Failure to accommodate thermal movement can cause panel warping, gapping, fastener failure, and visible seams. Proper gap detailing is crucial for long-term performance.
Table of Contents
- Substrate Preparation for Optimal WPC Wall Cladding Adhesion and Longevity
- Managing Thermal Expansion in WPC Wall Cladding Installations
- Acclimatization and Precision Alignment for Dimensional Stability of WPC Wall Cladding
- Fixing Methods and Supporting Accessories for Reliable WPC Wall Cladding Installation
-
FAQ
- What is the importance of preparing the substrate for WPC wall cladding?
- What are the key preparation requirements for different substrates?
- Why is acclimatization necessary for WPC wall cladding?
- How much expansion gap should be left between WPC cladding panels?
- What are the common methods for fixing WPC wall cladding?
- What are the consequences of ignoring thermal movement allowances?