 EN

Plan Coverage Before the First Panel Goes Up
Where to place panels in the room
A clear plan decides whether a treatment succeeds or fails. Before ordering materials, survey the room and mark hard, reflective surfaces where sound waves bounce. Acoustic wall panels perform well when placed opposite the main noise source and along the first reflection path. A rushed layout wastes panels on low-impact walls while leaving the worst echo untreated. Measure the space, sketch zones, and confirm the panel count before delivery.
How coverage percentage controls reverberation
Coverage percentage is the single biggest driver of the result. Room acoustics follow a curve: raising panel coverage from 15% to 40% cuts reverberation time sharply, while pushing past 60% yields diminishing returns. NRC, the noise reduction coefficient measured under ISO 354 and ASTM C423, shows how much sound absorption a surface provides in the lab. On site, only the covered area counts. A 30-square-meter wall needs roughly 12 square meters of absorbing face to reach a useful 40% coverage. Field results differ from the lab because the room keeps adding reflections. A bare canteen at lunch peak can exceed 75 decibel, loud enough to force raised voices. Adding 40% coverage typically lowers that by several decibel and shortens the echo tail. The aim is a balanced reverberation time matched to the room's use.
Mapping reflection points with room acoustics
Stand at the listening or speaking position and trace where voices and music first strike surfaces. These primary reflection points concentrate the energy that creates echo and lowers speech intelligibility. Mark them with tape. In a meeting room, place panels behind the speaker and on side walls at ear height. This targeted approach delivers more acoustic benefit than spreading panels evenly across every wall with no plan. Quality acoustic wall panels still fail on the wrong wall. Include corners and ceiling edges in the sketch before ordering.
Choose the Right Mounting Method per Surface
Adhesive versus clip mounting for different substrates
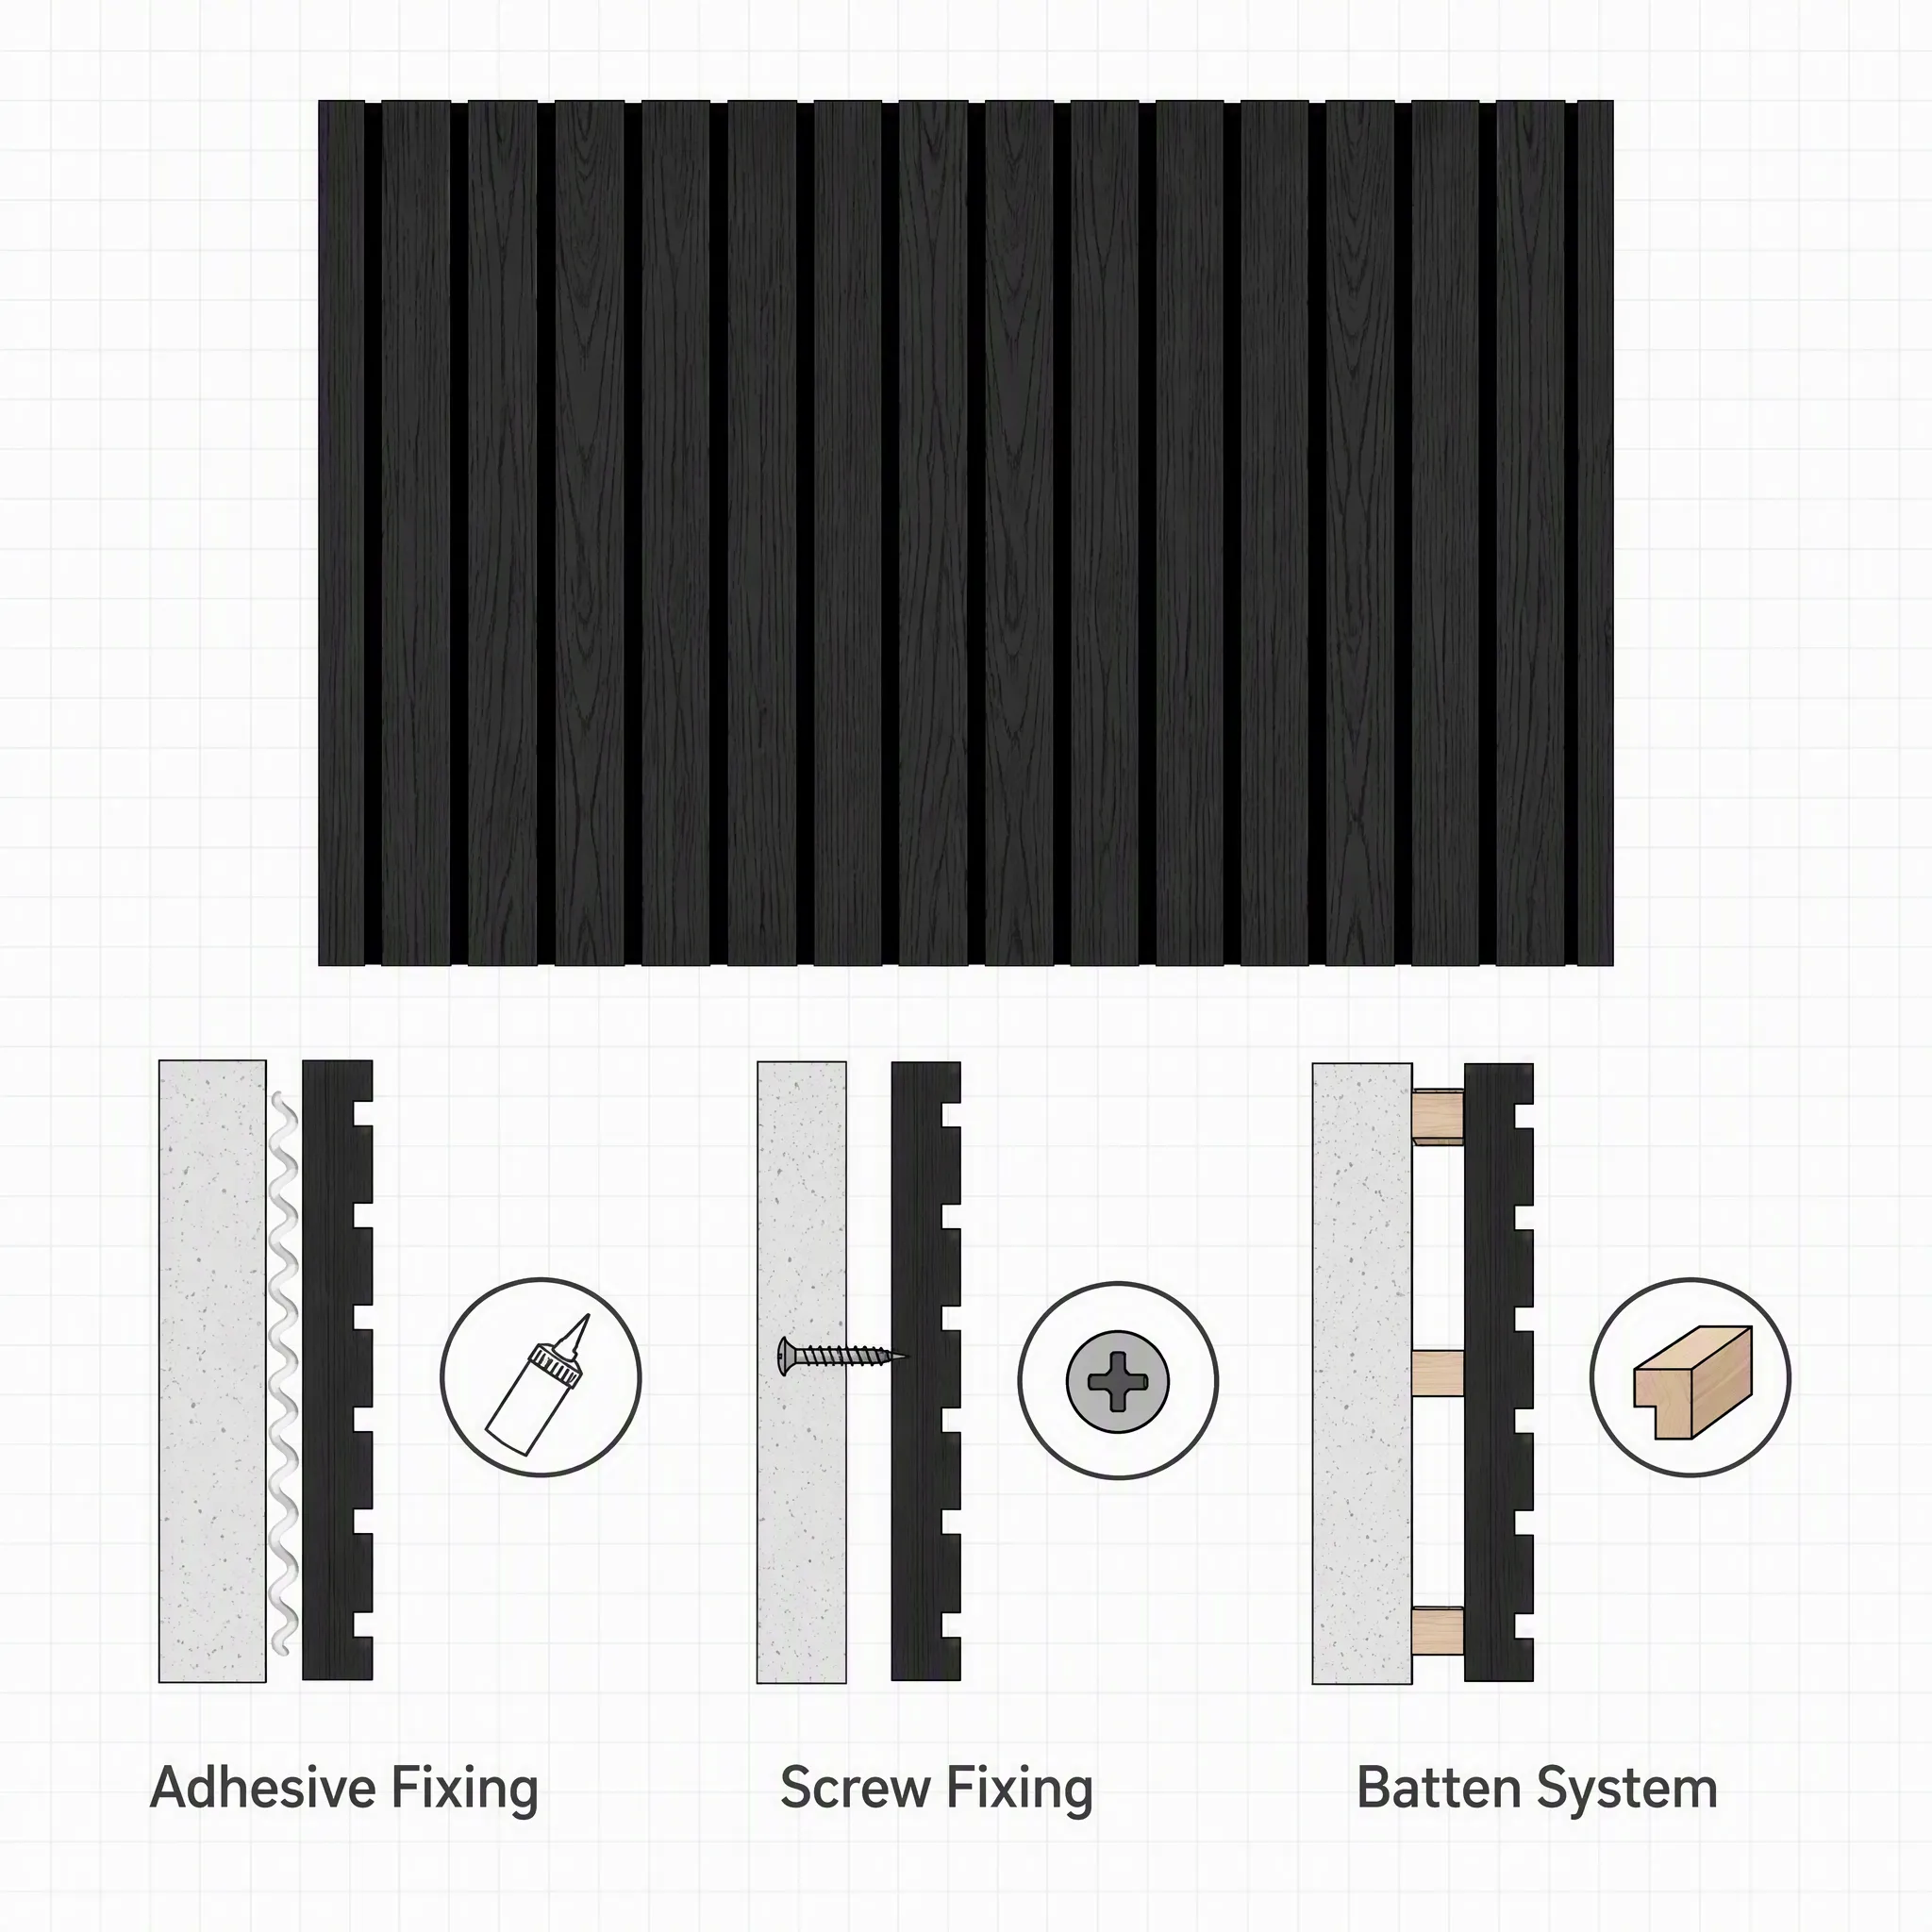
Substrate decides the fixing method. On sealed drywall or painted concrete, a high-tack construction adhesive gives a flush, gap-free bond that keeps the polyester fiber core tight to the wall. On uneven or moisture-variable substrates, mechanical clips or a batten frame hold the panel proud of the surface and let air circulate. Never rely on adhesive over dust, oil, or loose paint, or the bond fails within months and the panel drops. Identical acoustic wall panels react differently on concrete versus plasterboard. Always test a small area and respect the substrate's moisture tolerance per ANSI guidance.
Batten frames and mechanical fixing
A timber or aluminium batten grid creates a stable, level plane and hides minor wall defects. Clip-mounted panels can be removed for inspection and reinstalled without damage. This method suits high-traffic corridors and commercial ceilings where access matters. Keep batten spacing within the panel manufacturer's tolerance so the face stays flat; uneven battens cause visible wave and reduce the effective absorbing area. On uneven walls, acoustic wall panels need a batten grid to sit flat. Start large grids from a measured centerline to avoid a crooked final row.
Stop Flanking Paths That Steal Performance
Why edges and air gaps leak sound waves
Even a high-NRC product loses effect if sound finds a shortcut. Flanking happens when a sound wave travels around the panel edge or through an unsealed joint to a hard backing. Leave a consistent perimeter gap, then fill it with acoustic sealant so the wave cannot slip behind. Gaps larger than a few millimetres act as leaks that undo much of the absorption the face provides. Even strong acoustic wall panels leak through an open edge. Butting panels tight to a rigid ceiling lets vibration jump the seam and return as echo. Seal every joint, including where panels meet fixtures.
Ceiling-to-wall continuity and joints
For rooms with strong reverberation, extend treatment across the ceiling-to-wall junction. A continuous plane of absorbing material stops energy from rolling over the cornice and returning as echo. Where panels meet at corners, butt edges squarely and seal the seam. In open-plan offices, partial-height screens must connect to the ceiling plane or noise simply travels over the top. Door and window reveals are frequent flanking routes; carry treatment to the frame or fit acoustic seals. Ceiling acoustic wall panels must meet the wall plane without a gap.
Real Project Lessons, Inspection, and Care
A restaurant where poor installation failed the room
A 220-seat restaurant installed panels only on the back wall, leaving side walls and the ceiling bare. Diners reported that conversation became impossible once the room filled, and staff raised their voices, lifting background level near OSHA's recommended limit for speech. The fix reversed the plan: coverage rose to 45% across side walls and ceiling clouds, joints were sealed, and the same acoustic wall panels finally delivered calm, intelligible sound. The lesson was clear: material quality meant little until coverage and flanking were corrected.
Inspect, use, and maintain for lasting effect
After fixing, inspect every edge for lift and re-press any loose corner within 24 hours. Choose panels certified to ISO 354 and ASTM C423, and verify the supplier's NRC test report rather than a printed label. Clean surfaces with a soft vacuum brush; avoid wet wiping the rock wool core. Re-tighten clip systems yearly and check sealant at joints each season. Proper mounting and routine checks keep the acoustic performance stable for the building's service life.
Good installation turns raw material into real quiet. Plan coverage, seal flanking paths, and pick the right mounting for each surface. When acoustic wall panels are fixed with care and maintained, reverberation drops, speech intelligibility rises, and the room serves its purpose without retrofit.
Frequently Asked Questions
Question
What coverage percentage works for most rooms?
Answer: Most commercial rooms reach a good balance at 40% to 50% wall and ceiling coverage. Below 25% the reverberation time stays high and voices blur together. Above 60% the extra panels add cost without much further drop in echo. The right figure depends on room volume, hard surfaces, and use. Measure the space first, then plan coverage around the main noise source and reflection points.
Question
Why does flanking reduce panel performance?
Answer: Flanking is the path a sound wave takes around a panel instead of through it. When edges, joints, or ceiling gaps stay open, energy slips behind the absorbing face to a hard backing and returns as echo. A panel with a strong NRC rating loses much of its value if the room leaks. Sealing every perimeter gap with acoustic sealant and carrying treatment across junctions blocks these shortcuts and restores the intended sound absorption.
Question
How are acoustic wall panels mounted on concrete?
Answer: On sealed, dry concrete, a high-tack construction adhesive gives a flush bond that keeps the polyester fiber core tight to the wall. Clean the surface first and test a small area for pull strength. For uneven or damp walls, fit a timber or aluminium batten grid and use clips so the panel sits proud and air can circulate. Always respect the substrate's moisture tolerance and re-check edges within 24 hours of fixing.
Question
Can clip systems be reused after removal?
Answer: Yes, clip and batten mounted panels are designed for removal and reinstallation without damage to the face. Inspect the clips for fatigue and replace any bent or corroded parts before refitting. Keep the original batten spacing so the panel seats flat. Reused panels work well for revisable layouts in offices and retail, though repeated handling can mark the edges. Plan the grid carefully at the start so future changes stay simple and clean.
Question
Do ceiling clouds help in open-plan offices?
Answer: They help a great deal when planned correctly. Partial-height screens alone let noise travel over the top, so adding ceiling clouds closes that flanking route. Position the clouds above the main desks and meeting zones to cut reverberation and lift speech intelligibility. Pair them with wall treatment for full effect. For rooms with strong echo, a continuous ceiling plane works better than scattered tiles, and sealing the wall junction prevents energy from rolling back.